May 22, 2010

Productivity

I am using my last bits of energy to publish this post so I can share what a productive Saturday it has been. First I ran 3.8 miles this morning (there will be no pictures from this). This is a big deal since I just started running.....ever.  Since I was an infant I have had a heart defect called SVT that kept me from doing many things - running being one of them.  My junior year of high school I had heart surgery to repair it and was okayed for full activity by college - however it was really hard to just pick up the workout/running bug so it hasn't been until a few weeks ago, when Brandon's aunt and cousin encouraged me to join their "running club" that I learned that I can actually do it.  It has been great to gradually work up to 3.8 miles.  What an accomplishment that is for me!!  So - all that to say - I am exhausted.

I wish I could say that I spent the rest of the day recovering on the couch but instead I got right to work putting the finishing touches on our doors.  There isn't a huge difference but I painted all the trim so it is nice and fresh.


Before


After
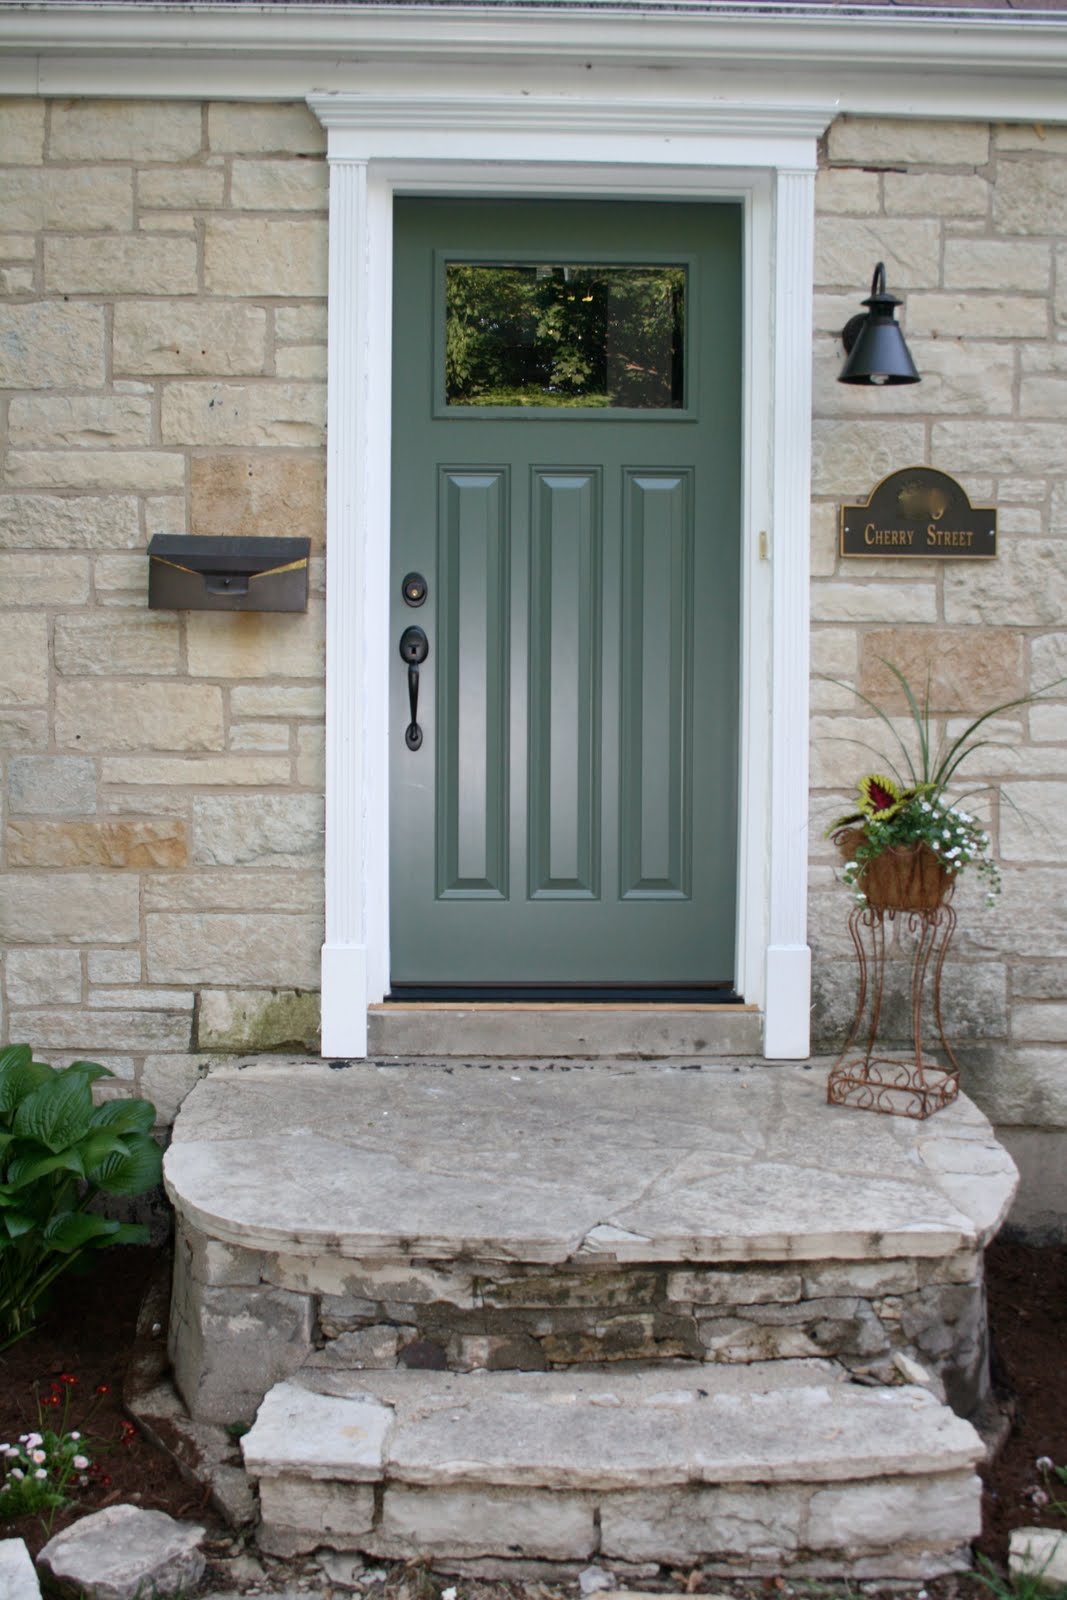
Oh - did you notice the new light too?  Just a few more touches and the front will be done.
And I know it's hard to see but I did paint all trim.


So while I was still painting this arrived....


yay.....so much fun!!  hours of fun!!  4 yards of fun!!

and I shared all the fun....


Can you just see the fun on his face?

It was a lot of hard, dirty work but it was so worth it.  
Mulch really makes a world of difference to the landscape.

I know our neighbors really appreciate it.  We are definitely the eye sore on the block.  They were even starting to drop hints about their favorite, affordable landscapers or simple things that would "look great on our house."  They are all so sweet and we love them all and hope they are proud.

I didn't get a chance to take post-mulch pictures since my arms were too tired to lift the camera so I will share those tomorrow - plus we had to run off to the in-laws for a belated Mother's Day dinner and craft. We made concrete, mosaic stepping stones for her lawn.  It was her idea and she had bought all the materials so we were happy to oblige plus they just opened the pool so we go to take a dip and relax our muscles from all the hard labor.  



Hudson learning to swim - it's been two years and he still can't get it.


Lola's turn. 


She didn't like it.


One bit.

And that leads us here....finally to the couch where Lola, Hudson and I are resting.  Brandon's playing Call of Duty - his form of relaxation.


Goodnight!


May 16, 2010

Sunroom Inspiration

With all this warmish, sunnyish weather I have been dreaming more and more of a sunroom.  What a wonderful retreat it would be - ahhhh lazy summer days.  So of course I have been stockpiling pictures of beautiful, inspirational rooms.  Can I share them with you?
coastal living


cottage living


Southern Living


Coastal Living


Coastal Living


Coastal Living


I could be very comfortable and relaxed in any of these spaces.  Maybe someday......

May 12, 2010

Sunroom please....

With two large dogs and a backdoor that opens directly into our kitchen it is more then just a desire to build a sunroom/mudroom on the back of our house.  It is quickly gaining priority over finishing the basement - it hasn't moved ahead yet - but it is getting very close.  Very very close.


So if we were ever to get to a place where it would be possible for such a huge addition I would like to bump out about 8-10 feet across the full length of the house (first floor only).  I know that would mean knocking down the tree and cutting into the deck a bit but it really is a large deck and if we did that then I would like to add stairs right in the middle onto the lawn, perhaps leading onto a stone patio.  Anyhoo....back to the inside.  In my dreams I would like for it to be paneled in white boards with lots of windows and an open ceiling.  Well let me show you what I have envisioned.


I would love the daybed in the far corner like so, windows and all.


Coastal Living

Here is a very rough mock-up of the would-be floor plan.


I don't think it is to scale but it gets the picture across.  Here is the room design again so you can see it side by side.

So that's the dream plan - the fun part.  We will see if it is ever in the books for execution.
Happy dreaming to you!


May 10, 2010

DIY: Luxuious Towel/Blanket

I love getting my Joann coupons in the mail.  The best part is they come to both myself and my husband - double of everything and they let me use them both at the same time!  So fun - especially when that 50 percenter rolls around.  So being the type of person to fall prey to this type of marketing I always have to come up with a project to create - or stroll the store for something fun and pretty.  This weekend, with two 40 percenters in hand, I decided to make a luxurious towel/blanket.  I saw one of these down in Florida for $100 and thought - hey I could make that.  One side was terry cloth and the other was a soft, durable fabric of varying textures.
I found this cute, summery fabric which was $2.99 a yard and then found a coordinating terry cloth color  to match.  I don't typically go for the girly, flowers but it was on clearance and since you can't use coupons on sale items it freed up my coupon to buy a sweet ribbon detail.  In the end I went for a soft and sweet look - next time I want to do something more funky!


The grand total for materials after thread and extra sewing needles was $30.  Oh I didn't mention that I bought 2.5 yards of both fabrics and then 8 yards of ribbon (that was where a lot of my cost was).

When I got home I laid the green terry cloth down so the side I wanted showing was facing up.


Then I laid the printed fabric face down on top of the terry cloth.


Once those were lined up and in place I pinned them together with the ribbon detail between like so....


Make sure the back edge of the ribbon is flush against the ends of the fabric.  Also make sure the ribbon (pretty part for better word) is facing in so that when you flip it right side out you see it.  I am terrible at directions and don't really know how to sew so let me know if you need a more thorough description.

Once it is all pinned in place sew along each edge starting with a short edge.  Once you have 1 short edge and 2 long edges sewn together, sew the 2nd short edge just half way and stop.  Unpin everything and flip it right side out so you have pretty seams all around.  Once you are ready you can hand sew that last section in place and you are done!!  


I cannot wait to use it for picnics, reading outside with the dogs, hanging at my in-laws pool or the lake house.  I probably won't actually use it as a towel for actual drying but for sunbathing or staying warm on the boat.  I think it would also be great for little babies at the pool, yard or beach.

I also recently just made these as baby blankets (aka one giant one for myself too).  Just use two soft fabrics.


Let me know if you try making one yourself.  If so, enjoy!

I shared this with Freckled Laundry.  Check out all the other great entries!

freckled laundry

I also shared this with Somewhat Simple!

giveaways

And Tatertots and Jello!
Join  us Saturdays at tatertotsandjello.com for the weekend wrap 
 up           party!

May 8, 2010

DIY: Headboard 101

In no way do I consider myself any type of expert, in anything really, but particularly in construction and upholstery but our bedroom drove me to desperate measures.  It is a great, charming room but it has terrible angles and no real straight wall for a bed.  Furniture placement has been awful which is why we do not want to buy a bedroom set - we won't be in this house forever and we would rather wait till we could get something we loved for a room we loved.

(exhibit A)  


(exhibit B)


So we took some old antiques from my parents but needed a headboard that would fit in this awkward space.


So the solution was easy - make my own custom headboard to fit perfectly in the space.  How do you do such a thing you ask?  You may be asking the wrong person but I will share what I threw together.  

You will need:  
Plywood cut to size
Foam batting
Fabric
Staple Gun
Decorative Nails
Bracket for hanging


First you staple the foam to the plywood.


Isn't the picture so informative....ha.

Then you staple the fabric over it.


My lovely baby sister Kate came over to help because it is soo much easier when you have more hands.  The fabric needs to be very tight.

Lastly, you measure out the location of the decorative nails if you want to use them and then carefully nail them in creating a nice tufting effect.  Or you could line the headboard with nails instead.  Lots of opportunities to customize it.


and voila....


A real grown-up bed!

And all for $40!!

May 5, 2010

New Doors

Well here you go, the new doors.


They still need some touch ups and a little bit of paint but I must say the new doors look so out of place with the old porch, light and mailbox.  All the more reason to get moving on those updates.

May 4, 2010

Knock Knock

After a long cold, drafty winter we are finally installing our new doors - TOMORROW!

Early this winter we discovered we had a major problem -


DOGS!

Have you noticed a recurring theme?  Yes our pups seem to create some aesthetic issues around here.  Good thing we love them a lot.  

While these are major problems, it isn't THE problem.  The reason why these doors could not come soon enough is because they don't work.  There are visual gaps between the doors and seal.  Thus it was a very cold and drafty winter.  We could not get our house to heat up above 64 degrees for the longest time, unless we did this - 


This posed several problems since a) we use that door the most, b) the dogs loved to tear it off and rip it into pieces and c) it was horribly ugly.  

While we were so set to replace the doors that very day, we learned from our contractor that replacing doors in the winter is stupid.  Well he didn't say it like that but I believe that would be the interpretation.  So finally, after months of waiting in misery, the day has come when we can gaze upon clean, fresh, tight doors and I do not have to be humiliated to greet our backdoor guests - since all our friends are backdoor guests.

Let us view a before shot of the front door....


So if all goes according to plan tomorrow I will show you the wonderful after shots because everyone loves a good before and after.
Related Posts Plugin for WordPress, Blogger...